
This page names everything you see. It is the reference the rest of the documentation leans on: when a later page says “the transport bar” or “the item pane”, this is where those names are defined. Read it once now, and come back to it whenever a term on another page does not ring a bell.
Nothing here changes anything. It is a tour, not a task.
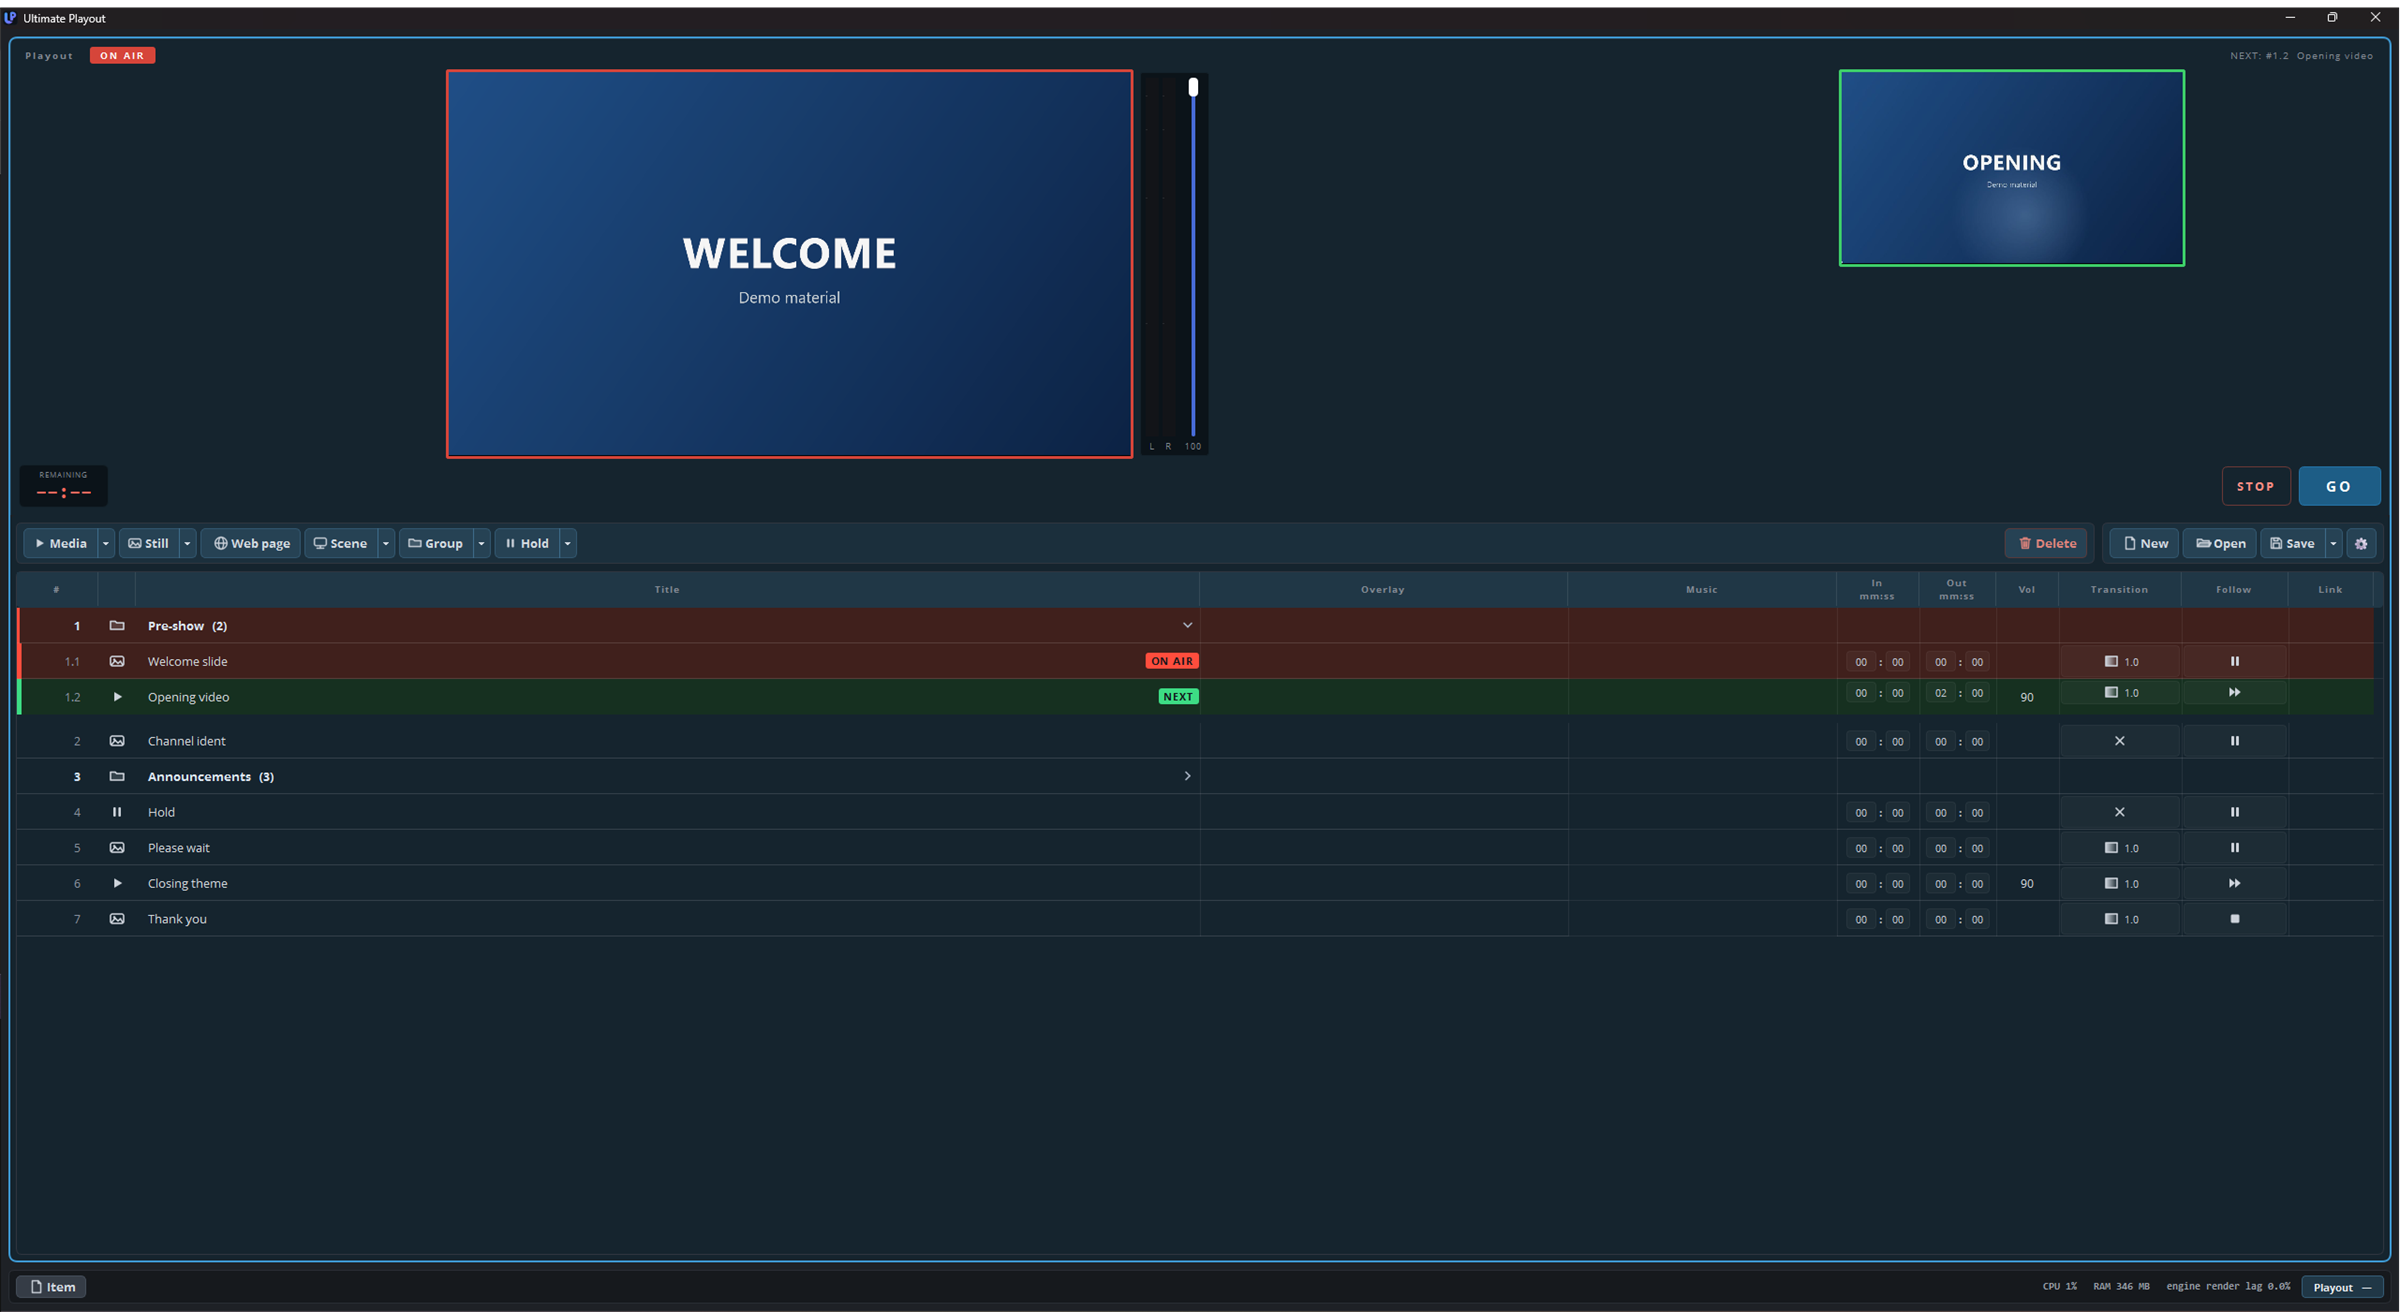
The three bands
The window is divided into three horizontal bands, top to bottom:
- The monitor panel — one per playout: preview, meters, transport.
- The work area — the toolbar and the cue list, with optional side panels.
- The status bar — panel buttons on the left, machine and output figures on the right.
The dividing line between the monitor panel and the work area can be dragged. More preview or more list — whichever suits the show.
1. The monitor panel
You get one panel per playout, side by side. With one playout it fills the width; with more, they share it.

From top to bottom:
The heading. The name of the playout on the left. Next to it an ON AIR badge when something is playing out — the badge sits beside the name rather than replacing it, so you can always tell which playout you are looking at. On the right, NEXT: followed by the cue this playout will take to air on the next GO.
The preview, with a VU column against the edge of the picture showing left and right. A red border appears round it while something is on air.
With nothing on air, arming a still or a scene shows it in the preview, so you can check a cue before anybody sees it. A media cue stays black until GO: video and audio only ever run when they are live.
The master fader for this playout, beside the picture.
The transport bar, along the bottom of the panel:

From left to right:
| Control | What it does |
|---|---|
| Countdown | Time remaining on what is playing, to a tenth of a second. Turns amber and then red as the end approaches, at thresholds you set yourself. |
| Play / pause | Holds the picture where it is, and lets it run again. |
| Restart | Back to the beginning of this cue. |
| Stop media | Stops the media itself, to black. |
| Timeline | Where you are in the cue. Drag it to scrub. The figures on the right show elapsed and total. |
| STREAM / REC | Start and stop streaming and recording. These two only appear when this playout’s output is a stream. |
| STOP | Stops this playout — to black. |
| GO | Takes the armed cue of this playout to air. |
Clicking anywhere on a panel makes that playout the active one, and the cue list underneath switches to its list. The whole panel is the target, picture included — you do not have to hit a tab.
2. The toolbar
Above the cue list, in two halves.

On the left, the buttons that add something. Several carry a small arrow with more choices behind it:
| Button | Adds |
|---|---|
| Media | Video and audio files. |
| Still | Stills. |
| Web page | A page to display — a schedule, a counter, a dashboard. |
| Scene | A scene as a cue. |
| Group | A container for a block of cues. Its arrow also holds Part. |
| Hold | A hold — a waiting point that stays until you go on. Its arrow holds Archive and Go to: two lines that never play along, one that stores and one that refers. |
Buttons a module supplies stand in this same row. If your toolbar has entries that are not in the table above, look for them in that module’s part of the manual.
On the right, the buttons that handle the list as a whole: Delete, New, Open and Save. The arrow beside Save exports the list as a bundle — the list plus all its media in one file.
At the far right, the gear: settings. All of them, for everything.
3. The cue list
The heart of the window. One line per cue.
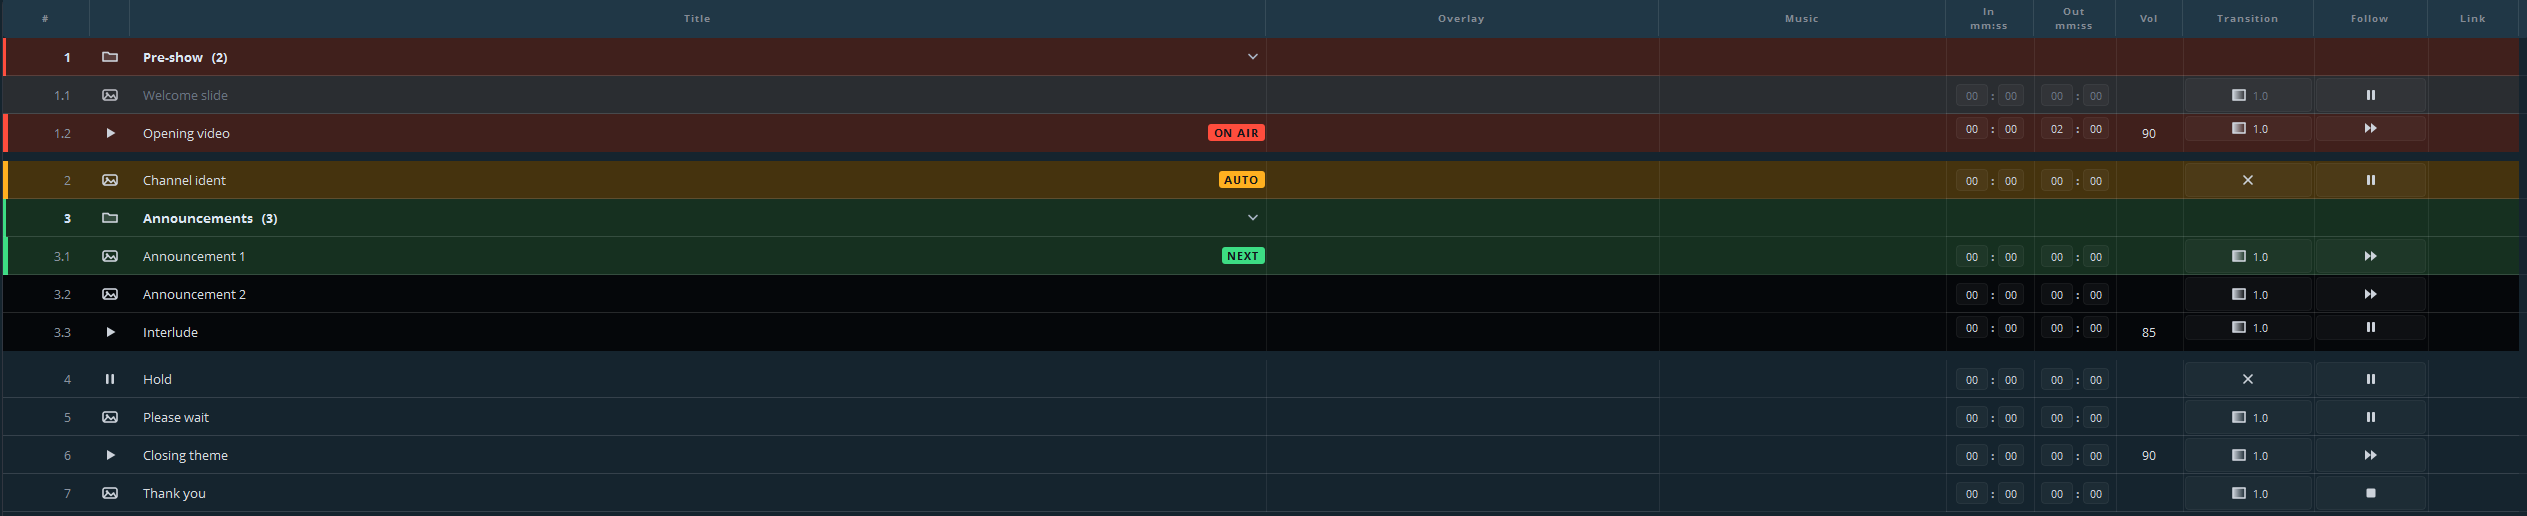
| Column | What it holds |
|---|---|
| # | The number, following the structure of the list. Renumbers itself. |
| (icon) | The type of cue, at a glance. |
| Title | The name. Editable. |
| Overlay | Whether an overlay belongs to this cue. |
| Music | The music bed running underneath this stretch of the list. |
| In / Out | Start and end point, mm:ss. |
| Vol | Volume for this cue. |
| Transition | How this cue comes in: a cross for a hard cut, otherwise the fade length in seconds. |
| Follow | What happens when it ends, as an icon: pause, next, repeat or stop. |
| Link | A cue on another playout that starts along with this one. |
A group is one line with the number of items behind its name and a chevron to open and close it. Clicking a line arms that cue: it turns green and takes the NEXT badge, and the next GO will fire it.
Right-clicking a line opens everything you can do to it: duplicate, rename, delete, set the follow action or transition for a whole selection at once, move to the archive, export.
Details of all of this are in part 2 — the cue list. For now: this is where the show lives, and the columns are the show’s settings.
4. The side panels
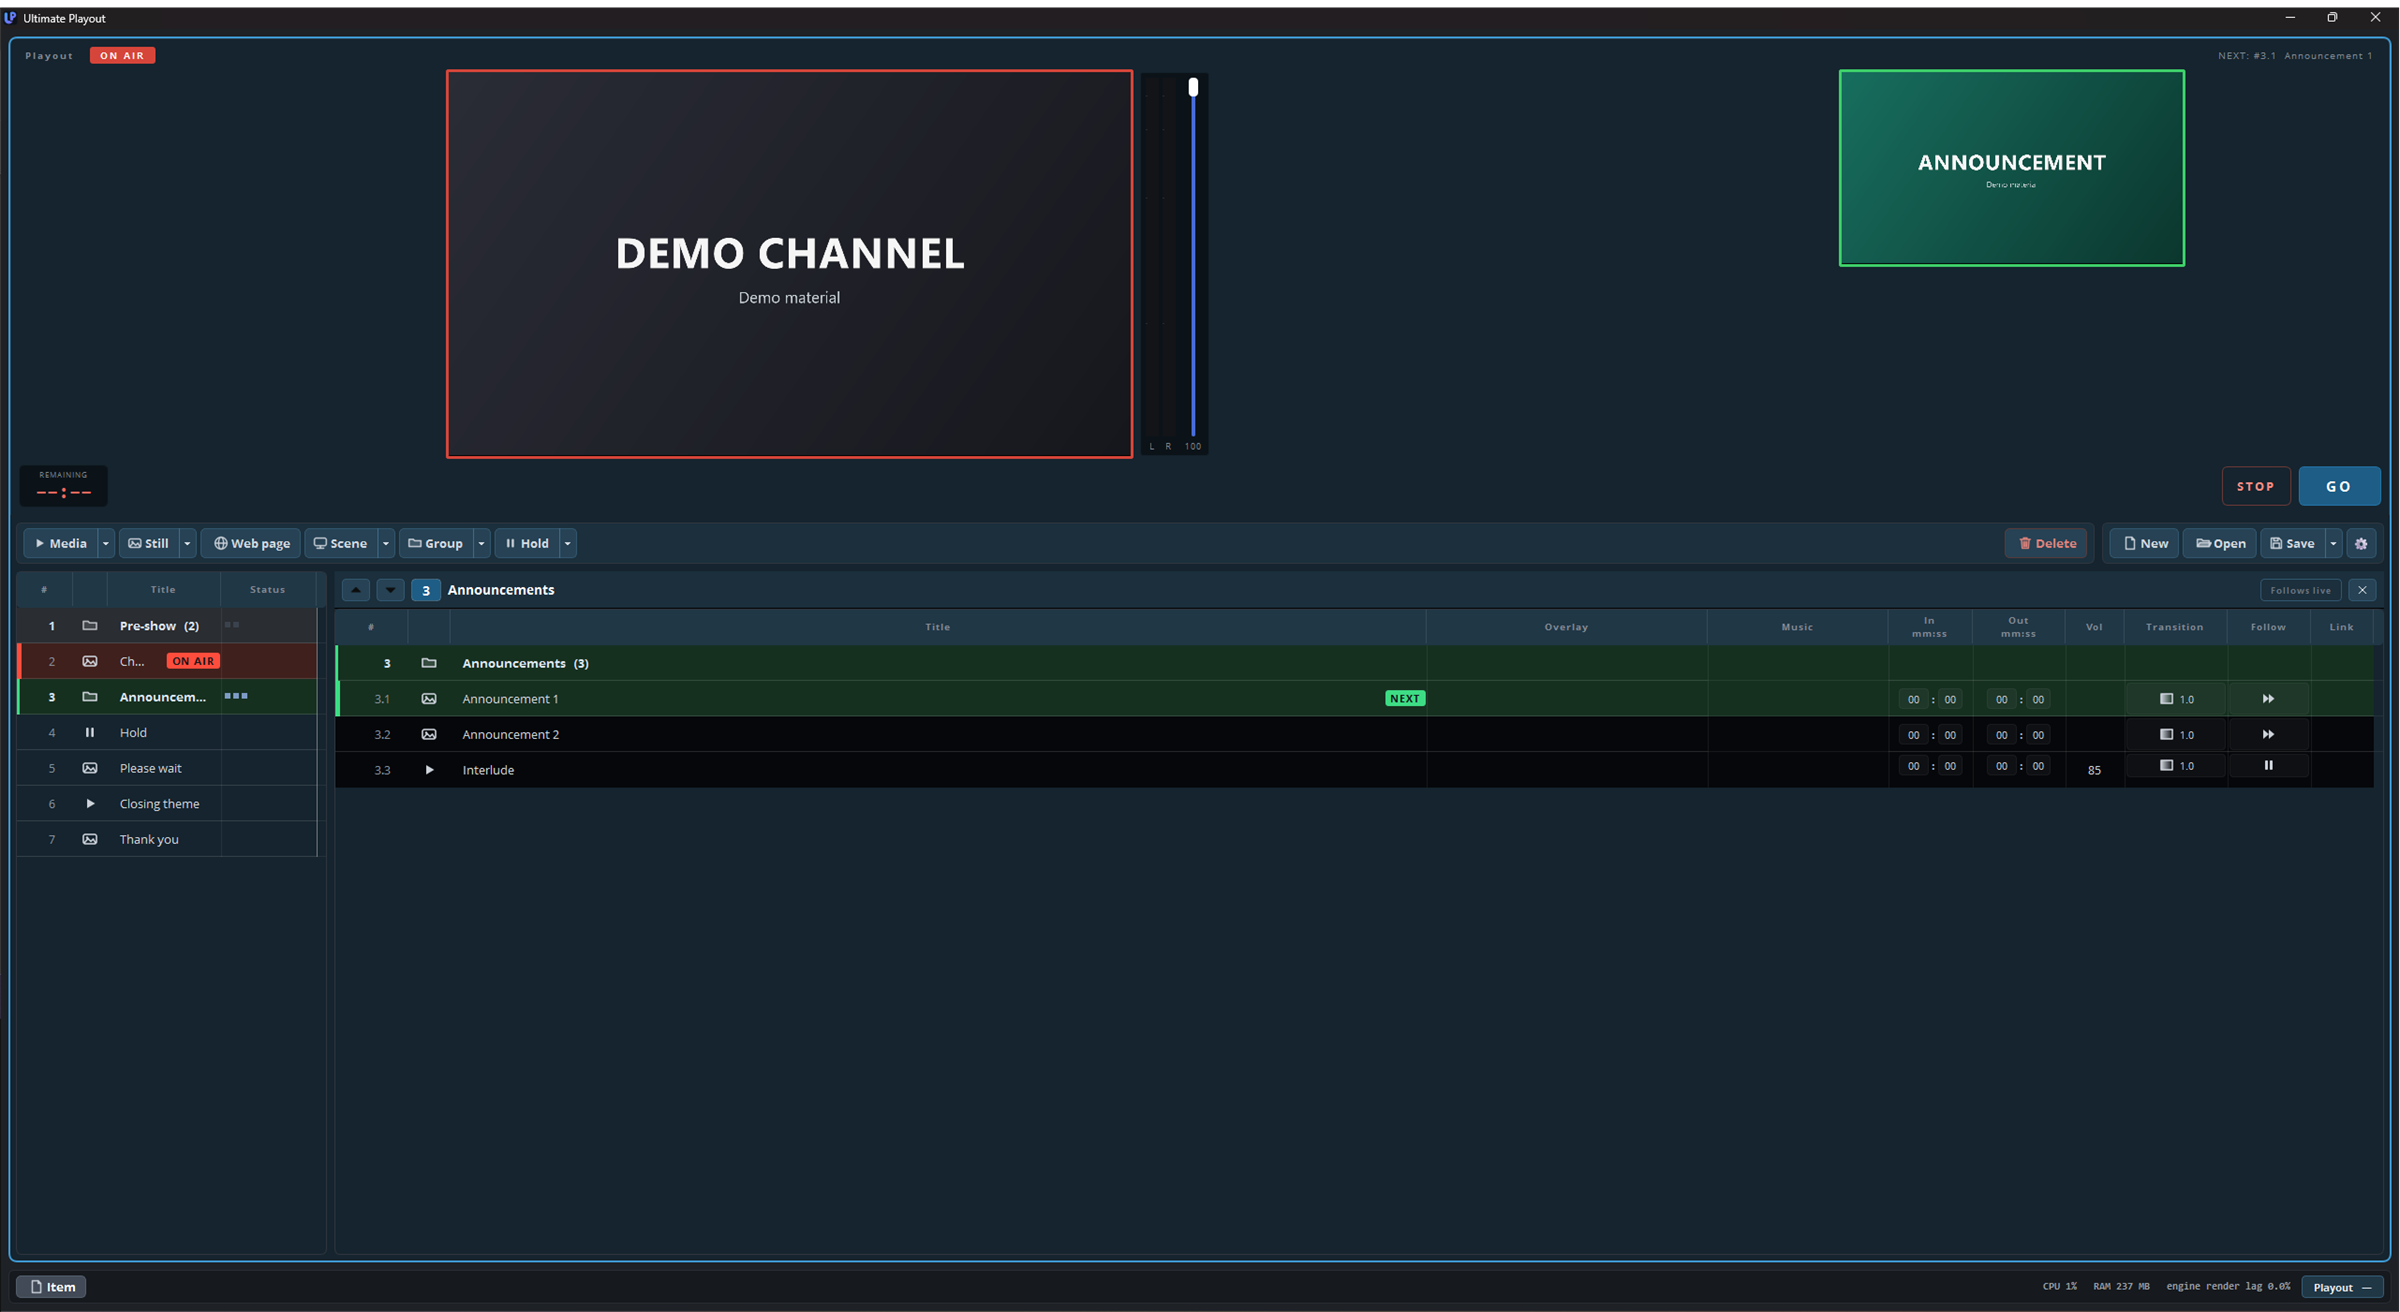
Two panels can share the horizontal space with the cue list. They are never open at the same time — you are either building a rundown or running a show without one.
The item pane (right) shows what is inside the line you selected: the steps of a group, the members of a playlist, the music bed underneath. While it is open the cue list narrows to number, title and status, so both fit.
The quick panel (left) is for putting things on air without a cue list. It only exists if you have a module that supplies content for it.
You open both from the buttons at the bottom left, in the status bar. The width you drag them to is remembered per playout.
5. The status bar
Along the bottom edge.

On the left, the panel buttons: the ones that open the side panels described above, plus Operate. That last one only appears when a web page is live and can be clicked, typed or scrolled in; it opens that page in a window you can work in. It never opens by itself, so no window grabs focus just after you have gone live.
On the right, the figures: processor, memory and render lag for the whole program, then one block per playout — its output and the number of dropped frames — in that playout’s own colour.
Those blocks are the fastest health check you have. An output that is running says so; frames going missing show up here first.
The keyboard
While the cue list has focus:
| Key | What it does |
|---|---|
| ↑ / ↓ | Move the green marker up and down. Nothing goes on air. |
| Enter or Space | GO — take the armed cue to air. |
| Esc | Stop — this playout to black. |
| P | Pause and resume the active playout. |
| Delete | Remove the selected cue or cues. |
These apply to the active playout: the one whose panel you last clicked.
Alongside these there are assignable hotkeys that work from anywhere in the program, including a set per playout. Those are covered in part 10.
Where to go next
Your first cue list — putting a working rundown together.